Create a project from scratch

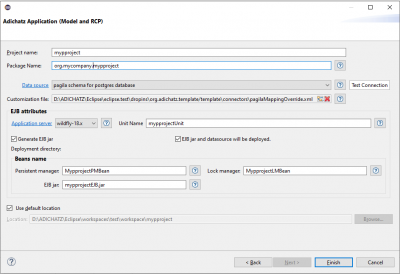
  1. In the Package Explorer right-click and select new / Project… / Adichatz Application (Model and RCP)
  2. In the open window:

Create project

  • Specify the project name.
  • Specify a connector between JSE, Wildfly 18.x, …
  • Look at other parameters and put your changes. Click on Data source and Application server hyper links to set right parameters for connections.
  • pagilaMappingOverride.xml customization file (see Customize scenarios) is an XML file associated with the Data source that allows you to add features and specificities to the project scenario.
  • You can choose to generate and deploy an EJB containing a persitence manager bean and a lock manager bean for the application.
  • Click Finish.

Your project is created, Model POJOs are generated by Hibernate tools, and an EJB is built and deployed to the Application Server.


Datasource and Application Server information are collected in file [eclipse_dir]/plugins/org.adichatz.template/template/connectors/connectors.xml.
File can be manually changed and jdbc connectors can be added in the directory of the file.


Main features of your first application are described below:

  • UI Side: a modern and flexible platform (Eclipse 4)
    • a modular architecture.
    • A powerful databinding solution.
    • Easy ways to customize or remodel your project.
    • JNDI implementation to be linked to the Application Server.
  • Server Side (in JEE context):
    • An EJB module for managing all changes and requests from UI side.
    • An EJB module for ensuring consistency (locks).
    • A implementation for OneToOne relationship for Hibernate.
    • A solution to automatically create incremental key (parent key, increment).