Navigators
Navigators parts are layout in the rigth panel of the application.
You may have several navigators and, in one navigator, nodes may come from different plugins.
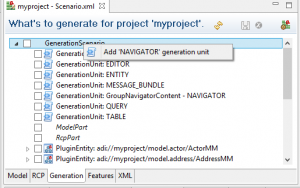
Step 1: Add a 'Tree Navigator' scenario
|
|
In the outline page:
|
|
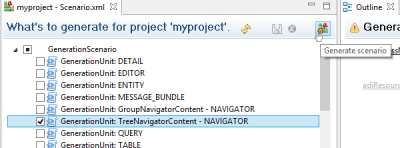
In the Scenartio Editor:
|
Step 2: Check navigator is added in 'AdichatzRcpConfig.xml' file
<?xml version="1.0" encoding="UTF-8" standalone="yes"?>
<adichatzRcpConfigTree xmlns:xsi="http://www.w3.org/2001/XMLSchema-instance" xsi:noNamespaceSchemaLocation="http://www.adichatz.org/xsd/v0.9.1/engine/adichatzRcpConfigTree.xsd">
    <rcpConfiguration>
        <param id="defaultQueryMaxResults" value="200"/>
        <param id="introPartURI" value="bundleclass://org.adichatz.engine/org.adichatz.engine.intro.DefaultIntroPanel"/>
        <param id="introOutlineURI" value="bundleclass://org.adichatz.engine.e4/org.adichatz.engine.e4.resource.RecentOutlinePage"/>
        <param id="defaultRefTextPopupURI" value="bundleclass://org.adichatz.jpa/org.adichatz.jpa.gencode.common.DefaultRefText"/>
        <param id="runtime.resources.dir" value="D:/ADICHATZ/Eclipse/eclipse.photon.target/dropins/org.adichatz.template_0.9.1.201812041207/template/resources"/>
        <param id="adichatzAvoidedMessages" value="HHH000412, HHH000206"/>
        <param id="adichatzGMapAPIKey" value="YOUR_GMAP_API_KEY"/>
        <navigators>
            <navigator id="groupNavigator" iconURI="platform:/plugin/org.adichatz.engine.e4/resources/icons/IMG_NAVIGATOR.png" contributionURI="bundleclass://org.adichatz.engine.e4/org.adichatz.engine.e4.part.GroupNavigator" label="adichatz.group.navigator" messageBundleURI="adi://myproject/./adichatzGroupNavigator">
                <menuPath adiResourceURI="adi://myproject/groupNavigator/GroupNavigatorContent"/>
                <menuPath adiResourceURI="adi://org.adichatz.jpa/./JpaMenu"/>
            </navigator>
            <navigator id="treeNavigator" iconURI="platform:/plugin/org.adichatz.engine.e4/resources/icons/IMG_NAVIGATOR.png" contributionURI="bundleclass://org.adichatz.engine.e4/org.adichatz.engine.e4.part.TreeNavigator" label="adichatz.tree.navigator" messageBundleURI="adi://myproject/./adichatzTreeNavigator">
                <menuPath adiResourceURI="adi://myproject/treeNavigator/TreeNavigatorContent"/>
                <menuPath adiResourceURI="adi://org.adichatz.jpa/./JpaMenu"/>
            </navigator>
        </navigators>
    </rcpConfiguration>
</adichatzRcpConfigTree>
Remark:
Lines 16, 17, 18 and 20 are added. It defines a new Navigator built from a TreeNavigatorScenario scenario.
Step 3: Execute application
No change id visible if you launch directly application. In fact, parts layout is read from '${WORKSPACE]/runtime-myproject.product/.metadata/.plugins/org.eclipse.e4.workbench/workbench.xmi' file.
|
To get around this problem:
|
|
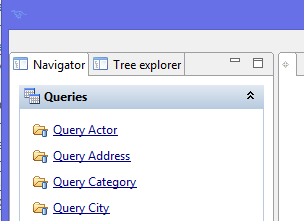
In this case, you have 2 navigators: 'Navigator' and 'Tree explorer'.
Menus can also be added programmatically to navigators as shown in methods org.adichatz.tool.ToolActivator.start(BundleContext) or org.adichatz.testing.TestingActivator.start(BundleContext). |


